Welcome To the Hoffman Amplifiers Forum

September 07, 2025, 05:25:17 am
guest image
Welcome, Guest. Please login or register.
-User Name
-Password


Hoffman Amps Forum image Author Topic: Chassis mounting tips  (Read 11074 times)

0 Members and 1 Guest are viewing this topic.

Offline jeff

  • Level 3
  • ***
  • Posts: 1238
  • Need input
Hoffman Amps Forum image
Chassis mounting tips
« on: March 07, 2013, 11:25:03 am »
I like the hammond aluminum chassis.
What is a good way to mount them to a head or cab?

Offline sluckey

  • Level 5
  • *******
  • Posts: 5075
    • Sluckey Amps
Hoffman Amps Forum image
Re: Chassis mounting tips
« Reply #1 on: March 07, 2013, 12:11:54 pm »
Two L brackets (or one continuous 1/2" x 1/2" aluminum angle )on each end of the chassis for head cab. I mounted some 3x4x17 Hammonds in 5E3 style combo cabs with bolts thru the top of the cab just as Fender did, but I also used some wood screws thru the ends of the chassis into the sides of the cab.

Beef up the mounting as best as you can. Those chassis cannot take any stress. You can literally take one of those 3x4x17 aluminum chassis and twist it like a pretzel with your bare hands.
A schematic, layout, and hi-rez pics are very useful for troubleshooting your amp. Don't wait to be asked. JUST DO IT!

stratele52

  • Guest
Hoffman Amps Forum image
Re: Chassis mounting tips
« Reply #2 on: March 07, 2013, 01:16:58 pm »
Head like Trainwreck  alu chassis;


www.trainwreck.com/?page_id=19

Or

ttp://www.google.ca/search?q=trainwreck+amp&hl=fr&client=safari&rls=en&tbm=isch&tbo=u&source=univ&sa=X&ei=ROc4UeHLBK3W0gH7n4HgBQ&ved=0CEIQsAQ&biw=1024&bih=673#imgrc=6L19swWeyKpZOM%3A%3Br9HqvJU6p3R2IM%3Bhttp%253A%252F%252Fimg.photobucket.com%252Falbums%252Fv735%252Ffreebass%252FRocket%252Fback.jpg%3Bhttp%253A%252F%252Fwww.gearslutz.com%252Fboard%252Fguitar-pedals-effects-amps-cabs-backline-accessories-etc%252F130371-trainwreck-amps-long-before-boutique-cool-2.html%3B1024%3B768

Offline catnine

  • Level 3
  • ***
  • Posts: 759
  • I am wordy and frustrating EAYOR
Hoffman Amps Forum image
Re: Chassis mounting tips
« Reply #3 on: March 07, 2013, 01:36:16 pm »
I only used one aluminum hammond chassis to make a head . It's easy to work with but I just mounted mine on the bottom of the cab tubes facing up and drilled holes through the bottom sides where they flod in and have about a 1/2" lip. Trouble is the aluminum does not due well if the tranny's have any weight to them . I also used those metal clip nuts that slip over and around the aluminum edge so you can use a sheet metal screw and not depend on the aluminum to hold the screw threads. This is the head .

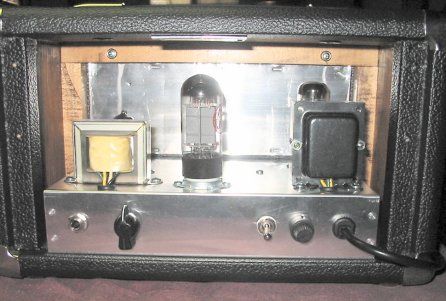
The back panel removed goes down to the chassis and has two cutouts like the tweed fenders for cooling.


 Later I changed the head into a parallel SE and used the black metal chassis , harder to work with but the end result is stronger, They also sell the bottom cover plate for both and this helps.

 I also used a black metal one for a tweed style chassis in a cab I built . I just drilled into the corners like fender did and used a large machine screw and inside the chassis top corners a washer and nut but still added side support to the bottom sides to keep it from bending and flexing . To support the bottom from flexing I drilled through the bottom lip and used the clip nuts and drilled through the back cover panel so once the back panel was in place and the two screws inserted it was pretty solid . If it's tweed style like Slucky did also works and that way you don't need to worry about the screws touching any of the tube sockets or wires. I kept mine spaced so they would clear and short enough so they didn't go in very far.

 I prefer the metal hammonds they have a sort of black krinkle finish which lends well if you want to do a faceplate with lables . I used the type of decals that are for model trains and planes you can get numbers and letters in any size and in gold or white . Microscale makes them . You set them in water and then they slide off and you set them and can move them into place then once dry use micro set or solvset which allows the decals to soften and hold on for ever and allow the decals to melt right into the paint and once dry the decal film cannot be seen  they look like they were lazer painted on. Most hobby shops carry them of on-line . All you need is a very fine pointed 2/0 of smaller model paint brush. They work great. They only seem to work on painted surfaces.
« Last Edit: March 07, 2013, 01:42:59 pm by catnine »

Offline HotBluePlates

  • Global Moderator
  • Level 5
  • ******
  • Posts: 13127
Hoffman Amps Forum image
Re: Chassis mounting tips
« Reply #4 on: March 07, 2013, 03:19:07 pm »
I used a 12ga Dirty Dawg Chassis for my Standel power amp chassis. I'm probably using transformers heavier than you might have an a 60-100w amp, and there is zero flexing.

I did ask for the corners of the chassis to be alumi-welded, and have the lip of the chassis turned outward. From there, holes in the chassis lip, hole in the cabinet, a T-nut in the cabinet hole and a machine screw through each. Solid as a rock.

Offline darryl

  • Level 2
  • **
  • Posts: 246
    • ValveTone Amplification
Hoffman Amps Forum image
Re: Chassis mounting tips
« Reply #5 on: March 07, 2013, 04:48:21 pm »
I attach flanges to the ends of the chassis, and then use cage nuts ( also called captive nuts ) to mount the chassis in a headshell.


Offline kagliostro

  • Level 5
  • *******
  • Posts: 7739
Hoffman Amps Forum image
Re: Chassis mounting tips
« Reply #6 on: March 08, 2013, 02:08:38 am »
Instead of cage nuts that requires a square hole


or T-nuts (I'm not sure HotBluePlates uses this kind of T-nuts)


I use Treaded inserts


K
The world is a nice place if there is health and there are friends

Offline HotBluePlates

  • Global Moderator
  • Level 5
  • ******
  • Posts: 13127
Hoffman Amps Forum image
Re: Chassis mounting tips
« Reply #7 on: March 08, 2013, 09:50:31 am »
Yes, if I knew about and had a source for those threaded inserts, I'd have used those.

Offline jeff

  • Level 3
  • ***
  • Posts: 1238
  • Need input
Hoffman Amps Forum image
Re: Chassis mounting tips
« Reply #8 on: March 08, 2013, 11:53:55 am »
Wow, those threaded inserts are a great idea! Where do you get them?

Thanks everyone, Lot to think about.
   Jeff

Offline Fresh_Start

  • Level 4
  • *****
  • Posts: 2856
  • noob de Lux
Hoffman Amps Forum image
Re: Chassis mounting tips
« Reply #9 on: March 08, 2013, 02:14:16 pm »
Has anyone used either steel or aluminum angle strips to reinforce the transformer mounting area?

darryl - I like your flange & cage nut approach.

Cheers,

Chip
Quote from: jjasilli
We have proven once again no plan survives contact with the enemy, or in this case, with the amp.

Quote from: PRR
Plan to be wrong about something.

Offline HotBluePlates

  • Global Moderator
  • Level 5
  • ******
  • Posts: 13127
Hoffman Amps Forum image
Re: Chassis mounting tips
« Reply #10 on: March 08, 2013, 03:28:23 pm »
No, but you very well could, especially if the transformer mounting bolts are also used to hold the new angle pieces.

Offline kagliostro

  • Level 5
  • *******
  • Posts: 7739
Hoffman Amps Forum image
Re: Chassis mounting tips
« Reply #11 on: March 08, 2013, 03:30:35 pm »
@ Jeff

Unfortunately I live in Italy, I find the treaded inserts at the local hardware store but this can't help you  :dontknow:

@ Fresh_Start

If the chassis isn't very large you can use aluminum angle strip or steel stripe, if it is large a good way is an aluminum plate of 2 mm thick,

---

Darryl's cage nuts are very professional but need a press machine for square holes

which is difficult to have under hand as Diyers

K
The world is a nice place if there is health and there are friends

Offline darryl

  • Level 2
  • **
  • Posts: 246
    • ValveTone Amplification
Hoffman Amps Forum image
Re: Chassis mounting tips
« Reply #12 on: March 08, 2013, 05:03:36 pm »
Darryl's cage nuts are very professional but need a press machine for square holes

. . . or you can drill a circular hole and laboriously file it out to square - as I do. 

Offline HotBluePlates

  • Global Moderator
  • Level 5
  • ******
  • Posts: 13127
Hoffman Amps Forum image
Re: Chassis mounting tips
« Reply #13 on: March 08, 2013, 07:25:19 pm »
I think by the 2nd amp, I'd be looking for a square punch. I know it would be very expensive, but for more than a couple amps, it seems the time (and wear on your hands) saved would be worth it.

Offline darryl

  • Level 2
  • **
  • Posts: 246
    • ValveTone Amplification
Hoffman Amps Forum image
Re: Chassis mounting tips
« Reply #14 on: March 08, 2013, 08:03:58 pm »
I think by the 2nd amp, I'd be looking for a square punch. I know it would be very expensive, but for more than a couple amps, it seems the time (and wear on your hands) saved would be worth it.

If I could justify that sort of money, I'd buy a punch for IEC power connectors first.

I don't like drilling/cutting/filing IEC holes!   

Offline Danskman

  • Level 2
  • **
  • Posts: 135
  • I love tube amps
Hoffman Amps Forum image
Re: Chassis mounting tips
« Reply #15 on: March 08, 2013, 09:50:21 pm »
About the IEC holes: I did some of them using a Dremel and cutting wheels. Worked easy, precise and cheap (once you buy the dremel!) and took about 1-2 minutes per hole . There are different wheels, for different kind of metal.
BR,
Danskman

Offline DummyLoad

  • SMG
  • Level 5
  • *****
  • Posts: 5791
Hoffman Amps Forum image
Re: Chassis mounting tips
« Reply #16 on: March 09, 2013, 01:22:30 am »
I don't like drilling/cutting/filing IEC holes!   

it's the devil of amp building. it does however do a lot to improve your dremel and filing skills, no?

now i use a milling machine. 500bux used + 100.00bux for a box of daewoo mill bits - cheaper than the IEC punch.  :BangHead:

--pete

Offline The_Gaz

  • Level 2
  • **
  • Posts: 265
Hoffman Amps Forum image
Re: Chassis mounting tips
« Reply #17 on: March 09, 2013, 03:38:59 am »
This is what I use:

http://www.mcmaster.com/#cadinlnord/94850a120/=lsu0lf

Same thing Soldano has always used.

Offline kagliostro

  • Level 5
  • *******
  • Posts: 7739
Hoffman Amps Forum image
Re: Chassis mounting tips
« Reply #18 on: March 09, 2013, 04:03:10 am »
@ Darryl

I think you have much patience with those square holes, are perfect to look  :thumbsup:

---

@ HotBluePlates

Before to think to a punch machine I'll look if I can find some Threaded Inserts on my area, may be you can find it

and you don't need to buy a specific (expensive) tool as to install the Treaded Inserts

This is a my friend idea

Rivettatrice per Inserti Filettati.wmv

---

@ The_Gaz

Your link opens but I see nothing in the page, only the search row  :dontknow:

Now all is fine

K
« Last Edit: March 09, 2013, 04:39:54 am by kagliostro »
The world is a nice place if there is health and there are friends

Offline catnine

  • Level 3
  • ***
  • Posts: 759
  • I am wordy and frustrating EAYOR
Hoffman Amps Forum image
Re: Chassis mounting tips
« Reply #19 on: March 09, 2013, 02:30:16 pm »
Wow, those threaded inserts are a great idea! Where do you get them?

Thanks everyone, Lot to think about.
   Jeff
 I know you can get them at ford dealerships parts department . They use them to moung luggage racks and mirrors and those tie downs used on PU trucks . I used a hydrolic pop rivet gun however you can uses a long bolt and a nut and washer . Just drill the hole then place the nut on the threaded bolt first then the flat washer . thread the bolt into the insert then hold the head of the bolt with a wrench the then bring the nut down against the flat washer and turn the nut . This pulls the collapsable part on the insert against the inserts flange and expands the insert. It takes more time than a pop rivet gun with the proper insert but works the same way.

 Still there are clip nuts that you can get that have either a hole for a sheet metal screw and ones for a machine screw . they are hard steel . you drill the hole so the clip nut when slid over the chassis lip butts flat against the lip then slid the clip nut one and run in the machine screw.
http://www.aircraftspruce.com/catalog/hapages/tinnerman2.php

http://www.alliedelec.com/search/productdetail.aspx?SKU=70165669

this is the type I used below.
 http://www.alibaba.com/showroom/clip-nuts.html


« Last Edit: March 09, 2013, 02:54:23 pm by catnine »


Choose a link from the
Hoffman Amplifiers parts catalog
Mobile Device
Catalog Link
Yard Sale
Discontinued
Misc. Hardware
What's New Board Building
 Parts
Amp trim
Handles
Lamps
Diodes
Hoffman Turret
 Boards
Channel
Switching
Resistors Fender Eyelet
 Boards
Screws/Nuts
Washers
Jacks/Plugs
Connectors
Misc Eyelet
Boards
Tools
Capacitors Custom Boards
Tubes
Valves
Pots
Knobs
Fuses/Cords Chassis
Tube
Sockets
Switches Wire
Cable


Handy Links
Tube Amp Library
Tube Amp
Schematics library
Design a custom Eyelet or
Turret Board
DIY Layout Creator
File analyzer program
DIY Layout Creator
File library
Transformer Wiring
Diagrams
Hoffmanamps
Facebook page
Hoffman Amplifiers
Discount Program